

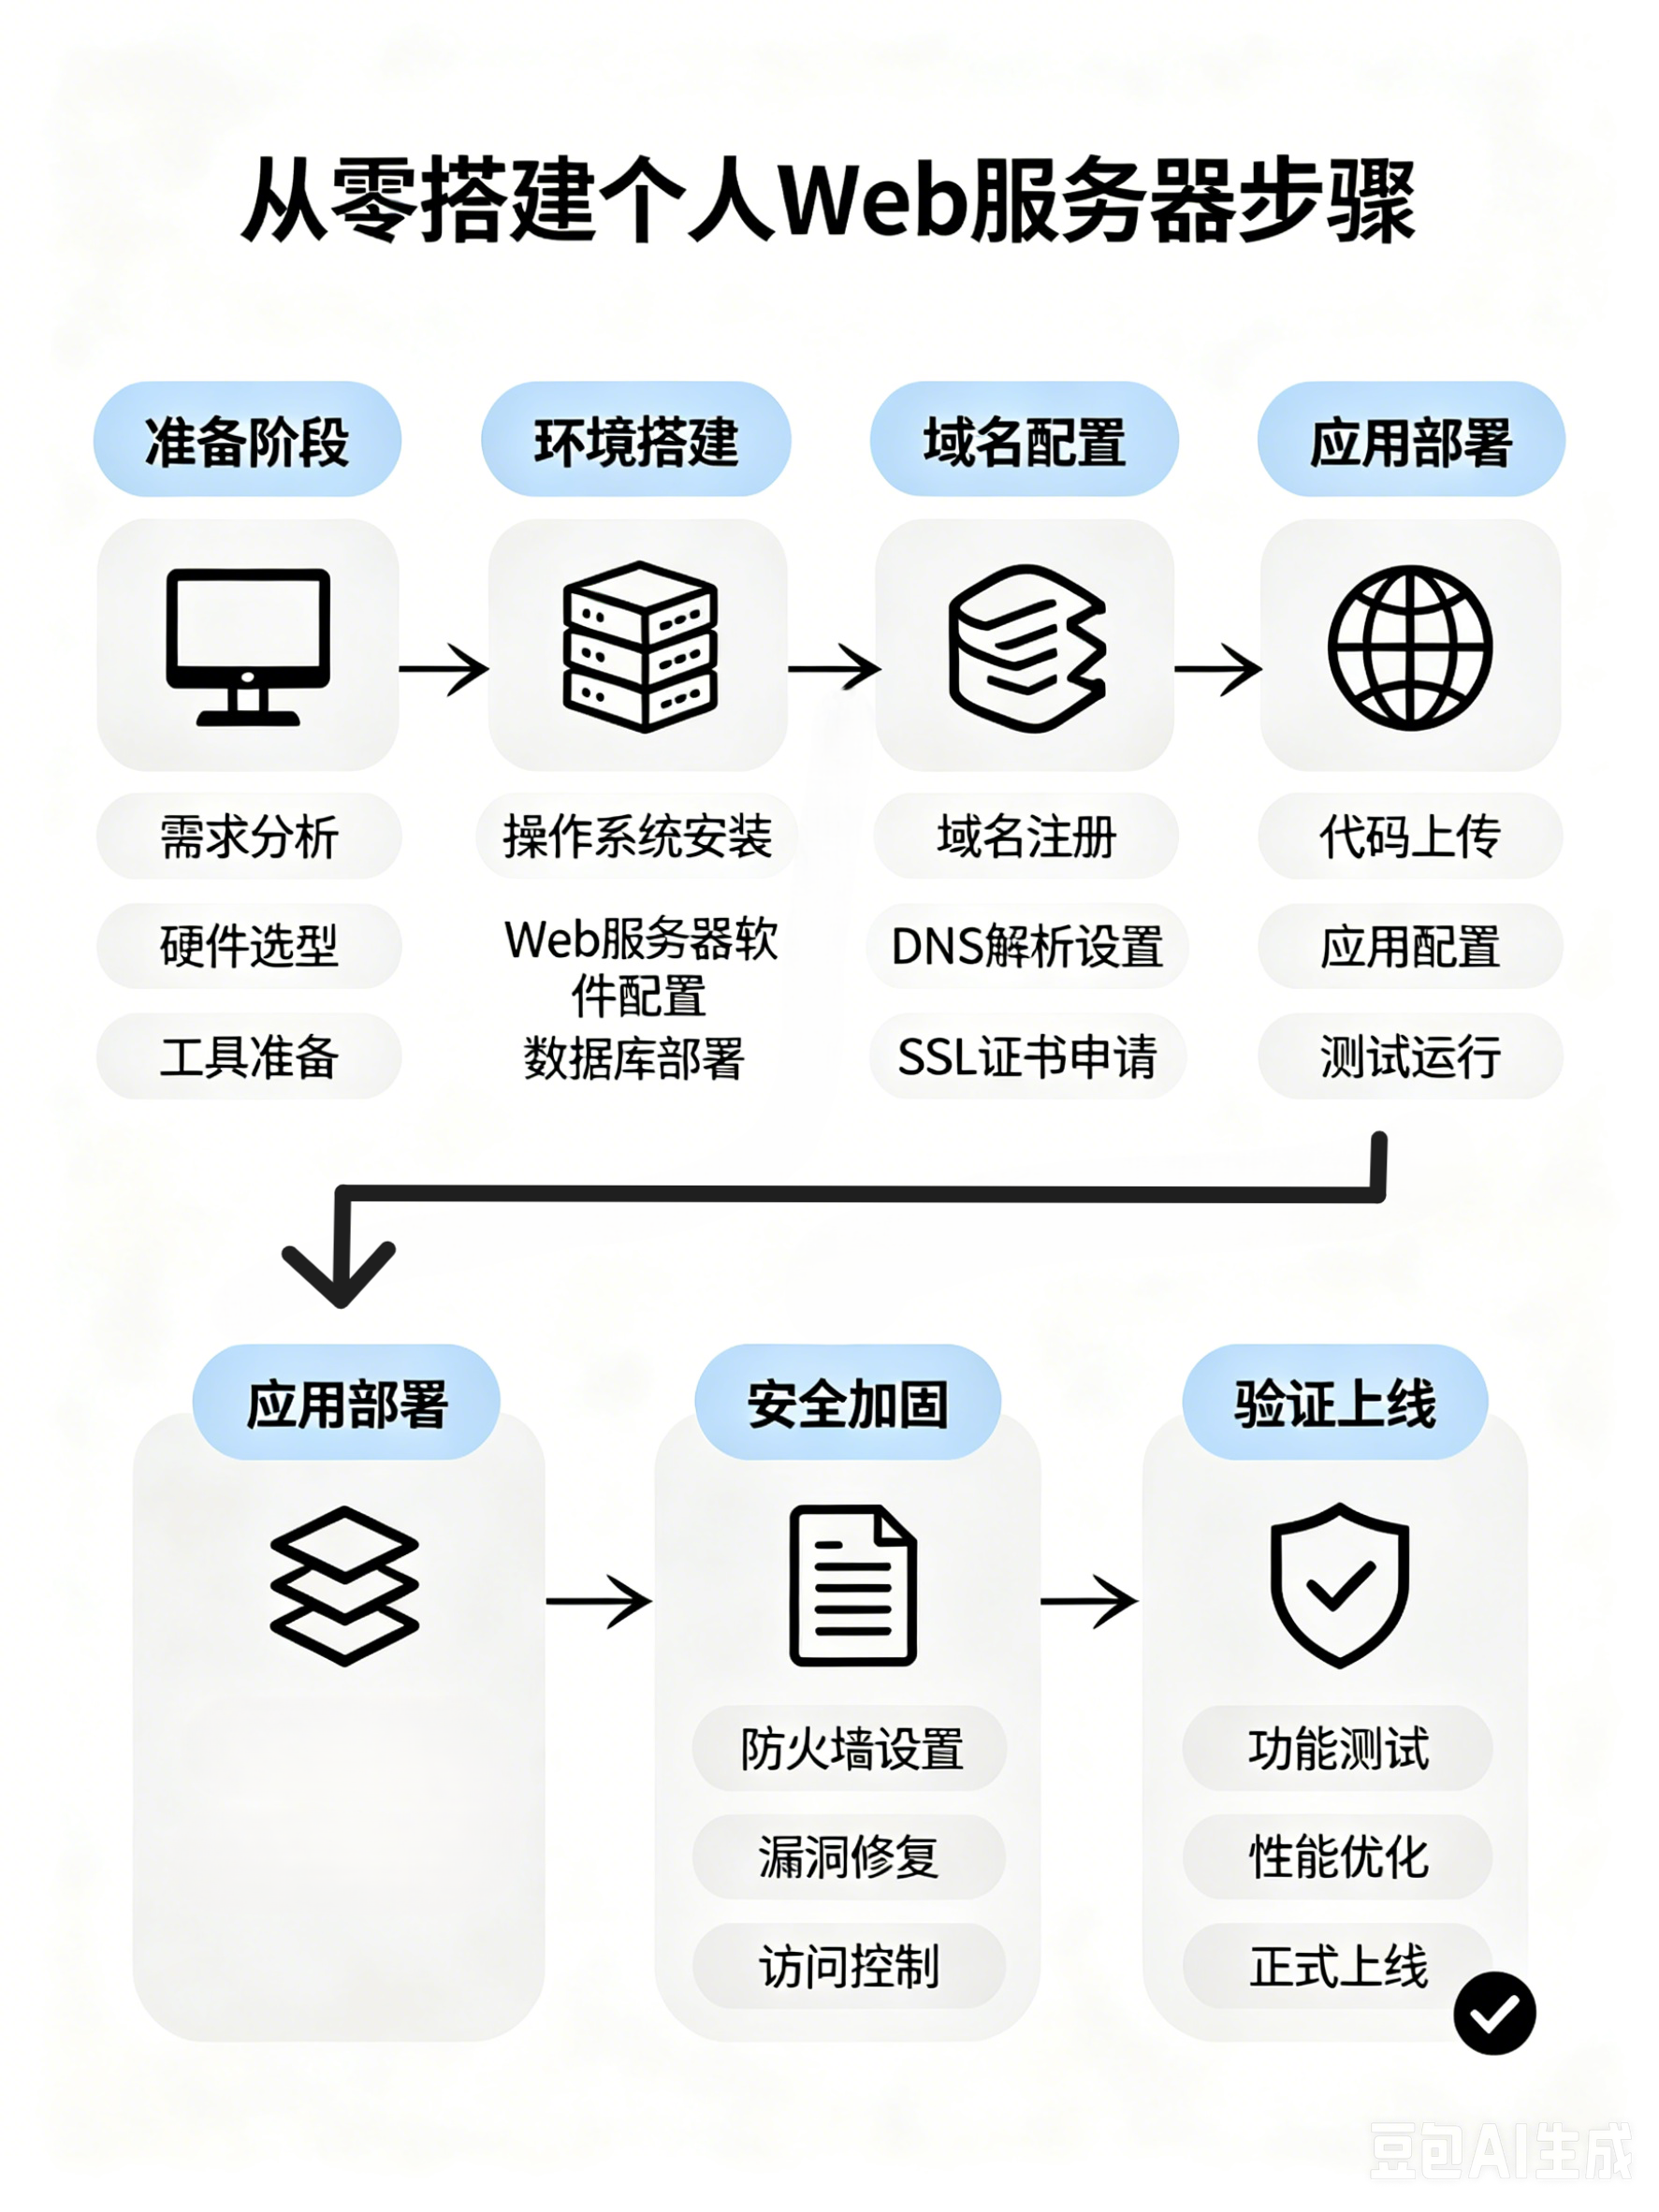
1. 购买服务器与域名
服务器
- 推荐:腾讯云轻量应用服务器(学生认证 78 元/首年)
- 配置:2核2G,3Mbps 带宽,40GB SSD
- 地域:选离自己最近的(上海/广州/北京)
- 系统:Ubuntu 24.04 LTS(64位)
域名
- 推荐:
.top域名(腾讯云首年 15 元,续费约 32 元/年) - 购买后完成实名认证(个人:身份证;企业:营业执照)
2. 配置服务器与安装 1Panel
2.1 首次登录服务器
# 本地电脑连接服务器(用腾讯云控制台给的密码,或提前设置密钥)
ssh ubuntu@你的服务器公网IP

# 首次登录后建议改密码
passwd

# 输出:
# Changing password for ubuntu.
# Current password: [输入旧密码]
# New password: [输入新密码]
# Retype new password: [确认]
# passwd: password updated successfully
2.2 更新系统
sudo apt update && sudo apt upgrade -y

# 输出类似:
# Hit:1 http://archive.ubuntu.com/ubuntu noble InRelease
# Reading package lists... Done
# Building dependency tree... Done
# 0 upgraded, 0 newly installed, 0 to remove and 0 not upgraded
2.3 安装 1Panel
# 官网安装命令(以 Ubuntu 为例)
curl -sSL https://resource.fit2cloud.com/1panel/package/quick_start.sh -o quick_start.sh && sudo bash quick_start.sh

# 安装过程输出:
# 开始安装 1Panel...
# 设置 1Panel 安装目录(默认为/opt):
# [直接回车默认 /opt]

# 设置 1Panel 端口(默认为18888):
# [直接回车默认 18888]

# 设置安全入口(默认为随机字符串,如 /a1b2c3d4):
# [建议自定义,如 /admin,务必记住]

# 设置面板用户(默认为随机):
# [建议设置,如 admin]

# 设置面板密码(默认为随机):
# [建议设置强密码]

# 安装完成输出:
# 1Panel 安装成功!
# 外网地址: http://你的公网IP:18888/安全入口
# 内网地址: http://192.168.x.x:18888/安全入口
# 用户名: [你的用户名]
# 密码: [你的密码]
# 安全入口: [/安全入口]
⚠️ 务必保存:外网地址、用户名、密码、安全入口
3. 域名备案与实名认证
3.1 域名实名认证
- 腾讯云控制台 → 域名注册 → 域名管理 → 实名认证
- 上传身份证,通常 1-24 小时通过
3.2 ICP 备案(国内服务器必须)
- 腾讯云控制台 → 备案 → 开始备案
- 需要:身份证、人脸识别、域名证书、服务器信息
- 填写网站名称(注意:不能含"博客"等敏感词,可用"个人主页"、"技术分享")
- 提交后等待管局审核,约 10-20 个工作日
- 备案期间网站不能访问,否则驳回
4. 域名解析
登录腾讯云域名控制台 → DNS 解析 → 添加记录:
| 记录类型 | 主机记录 | 记录值 | TTL |
|---|---|---|---|
| A | @ |
你的服务器公网 IPv4 | 600 |
| A | www |
你的服务器公网 IPv4 | 600 |
# 验证解析是否生效(本地电脑执行)
nslookup 你的域名

# 输出:
# Server:  192.168.1.1
# Address: 192.168.1.1#53
# Non-authoritative answer:
# Name:   你的域名
# Address: 你的服务器IP
5. 1Panel 环境配置
5.1 访问 1Panel
浏览器打开:http://你的公网IP:18888/安全入口
5.2 安装基础环境
应用商店安装:
- OpenJDK 17(或你项目需要的版本)
- MySQL 8.0
- Redis 7.0
- Nginx
安装时设置密码,务必保存:
MySQL root 密码: [自定义]
Redis 密码: [自定义]
5.3 开启外部访问(如需)
1Panel → 面板设置 → 安全 → 开启外部访问
⚠️ 安全建议:修改默认端口 18888 为其他端口,或限制 IP 访问
6. 项目目录规范
# 创建规范目录结构
sudo mkdir -p /opt/你的应用名/{app,logs,bin,config}
sudo chown -R ubuntu:ubuntu /opt/你的应用名

# 目录说明:
# /opt/你的应用名/
# ├── app/          # JAR 包、前端文件
# ├── config/       # 外部配置文件(application.yml)
# ├── logs/         # 应用日志
# └── bin/          # 启动/停止脚本、数据库备份脚本
7. 上传应用与 Nginx 配置
7.1 上传应用文件
# 方式1:1Panel 文件管理器直接上传
# 方式2:SCP 命令(本地电脑执行)
scp 你的应用包.jar ubuntu@你的服务器IP:/opt/你的应用名/app/
scp application.yml ubuntu@你的服务器IP:/opt/你的应用名/config/
7.2 安装 Nginx(1Panel 应用商店或命令)
# 如用命令安装
sudo apt install nginx -y

# 检查状态
sudo systemctl status nginx

# 输出:
# ● nginx.service - A high performance web server
#    Active: active (running) since ...
7.3 配置 Nginx
# 创建配置文件
sudo nano /etc/nginx/sites-available/你的应用名
写入配置:
server {
    listen 80;
    server_name 你的域名 www.你的域名;

    # 日志路径
    access_log /var/log/nginx/你的应用名.access.log;
    error_log /var/log/nginx/你的应用名.error.log;

    # 文件上传大小限制(根据应用需求调整,如 10MB)
    client_max_body_size 10M;

    location / {
        proxy_pass http://127.0.0.1:8080;
        proxy_http_version 1.1;

        # 关键代理头
        proxy_set_header Host $host;
        proxy_set_header X-Real-IP $remote_addr;
        proxy_set_header X-Forwarded-For $proxy_add_x_forwarded_for;
        proxy_set_header X-Forwarded-Proto $scheme;

        # 超时设置
        proxy_connect_timeout 60s;
        proxy_send_timeout 60s;
        proxy_read_timeout 60s;
    }
}
# 启用配置
sudo ln -s /etc/nginx/sites-available/你的应用名 /etc/nginx/sites-enabled/

# 检查语法
sudo nginx -t

# 输出:
# nginx: the configuration file /etc/nginx/nginx.conf syntax is ok
# nginx: configuration file /etc/nginx/nginx.conf test is successful

# 重载配置
sudo systemctl reload nginx
7.4 防火墙放行
# 检查防火墙状态
sudo ufw status

# 如果未启用,建议启用并放行必要端口
sudo ufw allow 22/tcp      # SSH
sudo ufw allow 80/tcp      # HTTP
sudo ufw allow 443/tcp     # HTTPS
sudo ufw allow 18888/tcp   # 1Panel(如需外部访问)
sudo ufw enable

# 输出:
# Firewall is active and enabled on system startup
# Status: active
# To                         Action      From
# --                         ------      ----
# 22/tcp                     ALLOW       Anywhere
# 80/tcp                     ALLOW       Anywhere
# 443/tcp                    ALLOW       Anywhere
⚠️ 腾讯云安全组:控制台 → 安全组 → 入站规则,同样放行 80/443
8. SSL 证书配置(HTTPS)
8.1 安装 Certbot
sudo apt install certbot python3-certbot-nginx -y
8.2 申请证书
sudo certbot --nginx -d 你的域名 -d www.你的域名

# 交互过程:
# Enter email address (used for urgent renewal and security notices): [你的邮箱]
# ...
# Please read the Terms of Service ... (A)gree/(C)ancel: A
# ...
# Would you be willing ... (Y)es/(N)o: Y 或 N
# ...
# Which names would you like to activate HTTPS for?
# 1: 你的域名
# 2: www.你的域名
# Select the appropriate numbers separated by commas and/or spaces: 1 2
# ...
# Deploying certificate
# Successfully deployed certificate for 你的域名 to /etc/nginx/...
# Successfully deployed certificate for www.你的域名 to /etc/nginx/...
8.3 续期测试
sudo certbot renew --dry-run

# 输出:
# Congratulations, all simulated renewals succeeded:
#   /etc/letsencrypt/live/你的域名/fullchain.pem
Certbot 会自动添加 systemd 定时任务,无需手动续期。
8.4 检查 Nginx 最终配置
sudo nginx -T | grep -A 30 "你的域名"

# 应该看到:
# listen 443 ssl http2;
# ssl_certificate /etc/letsencrypt/live/你的域名/fullchain.pem;
# ssl_certificate_key /etc/letsencrypt/live/你的域名/privkey.pem;
# 以及 HTTP 自动跳转 HTTPS 的配置
# 重载确保生效
sudo systemctl reload nginx
9. 应用启动与日志管理
9.1 创建启动脚本
sudo nano /opt/你的应用名/bin/start.sh
写入:
#!/bin/bash
APP_NAME="你的应用包.jar"
APP_DIR="/opt/你的应用名"
LOG_DIR="$APP_DIR/logs"
CONFIG_DIR="$APP_DIR/config"
LOG_FILE="$LOG_DIR/app.log"
PID_FILE="$APP_DIR/app.pid"

# 日志截断:保留最近 7 天,或超过 100MB 时轮转
LOG_MAX_SIZE="100M"
LOG_KEEP_DAYS=7

# 创建日志目录
mkdir -p $LOG_DIR

# 如果日志存在且过大,先备份
if [ -f "$LOG_FILE" ]; then
    LOG_SIZE=$(stat -c%s "$LOG_FILE")
    MAX_SIZE_BYTES=$(numfmt --from=iec $LOG_MAX_SIZE)
    if [ $LOG_SIZE -gt $MAX_SIZE_BYTES ]; then
        mv "$LOG_FILE" "$LOG_FILE.$(date +%Y%m%d%H%M%S).bak"
    fi
fi

# 清理旧日志
find $LOG_DIR -name "app.log.*.bak" -mtime +$LOG_KEEP_DAYS -delete

# 启动应用
nohup java -jar \
  -Dspring.config.location=$CONFIG_DIR/application.yml \
  -Dlogging.file.name=$LOG_FILE \
  $APP_DIR/app/$APP_NAME \
  > $LOG_FILE 2>&1 &

# 保存 PID
echo $! > $PID_FILE

echo "Application started, PID: $!"
echo "Log file: $LOG_FILE"
# 赋予执行权限
chmod +x /opt/你的应用名/bin/start.sh
9.2 创建停止脚本
sudo nano /opt/你的应用名/bin/stop.sh
#!/bin/bash
PID_FILE="/opt/你的应用名/app.pid"

if [ -f "$PID_FILE" ]; then
    PID=$(cat $PID_FILE)
    if ps -p $PID > /dev/null; then
        kill $PID
        echo "Application stopped (PID: $PID)"
        rm $PID_FILE
    else
        echo "Process not running, cleaning PID file"
        rm $PID_FILE
    fi
else
    echo "PID file not found, application may not be running"
fi
chmod +x /opt/你的应用名/bin/stop.sh
9.3 使用 systemd 管理(推荐替代脚本)
sudo nano /etc/systemd/system/你的应用名.service
[Unit]
Description=你的应用描述
After=network.target mysql.service redis.service

[Service]
Type=simple
User=ubuntu
WorkingDirectory=/opt/你的应用名
ExecStart=/usr/bin/java -jar -Dspring.config.location=/opt/你的应用名/config/application.yml -Dlogging.file.name=/opt/你的应用名/logs/app.log /opt/你的应用名/app/你的应用包.jar
SuccessExitStatus=143
Restart=on-failure
RestartSec=10
StandardOutput=append:/opt/你的应用名/logs/app.log
StandardError=append:/opt/你的应用名/logs/app.log

[Install]
WantedBy=multi-user.target
# 启用并启动
sudo systemctl daemon-reload
sudo systemctl enable 你的应用名
sudo systemctl start 你的应用名

# 查看状态
sudo systemctl status 你的应用名

# 查看日志
sudo journalctl -u 你的应用名 -f
9.4 日志轮转(logrotate)
sudo nano /etc/logrotate.d/你的应用名
/opt/你的应用名/logs/*.log {
    daily
    rotate 7
    compress
    delaycompress
    missingok
    notifempty
    create 0644 ubuntu ubuntu
    size 100M
    postrotate
        # 如果应用支持 USR1 信号重载日志,取消下面注释
        # kill -USR1 $(cat /opt/你的应用名/app.pid) > /dev/null 2>&1
    endscript
}
10. 最终验证
# 1. 本地测试应用
curl -I http://127.0.0.1:8080

# 2. 测试 Nginx 反代
curl -I http://127.0.0.1

# 3. 测试 HTTPS(服务器上)
curl -I https://你的域名

# 4. 外部测试(本地电脑)
curl -I https://你的域名
# 或浏览器直接访问
常见问题速查
| 现象 | 排查 |
|---|---|
| 域名不通 | nslookup 检查 DNS,安全组检查 80/443 |
| 502 Bad Gateway | 应用未启动,或端口不对 |
| 证书错误 | certbot renew --dry-run,检查域名解析 |
| 日志过大 | logrotate 配置,或 journalctl --vacuum-size=100M |
| 应用启动失败 | journalctl -u 你的应用名 -n 50 看日志 |

评论 (1)
评论